
How to Recover Access/Login to your AWS Instance After Losing Your .pem KeyPair File
OVERVIEW
How To Recover Access To Your AWS Instance After Losing Your KeyPair
OVERVIEW
This post highlights the steps needed to recover access to your AWS EC2 Instance after loosing or misplacing your ssh .pem key-pair file
What is a key-pair file?
If you are asking this yourself, then maybe this post is not the right one for you. However, a key-pair is a combination of a public and private key. Amazon EC2 uses public-key cryptography to encrypt and decrypt login information.
Very often people lost access to their AWS EC2 Instances. This can happen for many different reasons such as switching to a new computer, losing one’s files, becoming responsible for someone else’s AWS deployments and much more. When this happens, there is a need to recover access to these instances.
Below is a summary of the steps required and covered in this post to recover access to your EC2 Instance after losing your key-pair
- Gather config details of the original(target) instance.
- Power off the original(target) EC2 instance of which you want to regain access.
- Launch new (recovery) instance and generate new key-pair
- Login via ssh to the new recovery instance
- Detach the primary EBS volume from original(target) instance (taking note of its current attachment)
- Attach/Mount the previously detached volume to the new(recovery) instance
- Copy authorized keys from recovery instance to the mounted (target) volume
- Unmount target volume from recovery instance and reattach back to original (target) instance using configs noted earlier
- Start the original (target) instance and login with new key-pair
- Delete temporary(recovery) instance
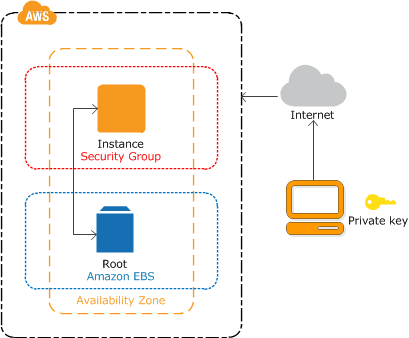
Disclaimer: This process requires a stop and start of your AWS Instance thus It can only be done on an EBS backed instance. it’s not possible to do this procedure on store-backed instances. (if you are unsure of your instance type, see below)
To view your instance root device type,
Login to your EC2 Dashboard → Click on instances -> Select the target instance → In the properties pane, locate ‘Root device type’. if this value is set to ‘ebs’ as shown in the image below then you have an ebs backed instance and can proceed :)

Pre-requisite
Note down on a piece of paper the following details about the instance you will like to regain access to (all details are found in the instance properties pane).
- security group, availability zone e.g.(us-west-1b), root device type e.g. (ebs), root device e.g. /dev/xvda
Next, we create a new instance with a similar configuration to the instance we will like to gain access to.
In this post, variables are written in-between curly braces e.g {variable_name}. Replace these with your own values.
Launch New Recovery Instance
Select ‘ Launch Instance’ button on the instance view page of your EC2 dashboard
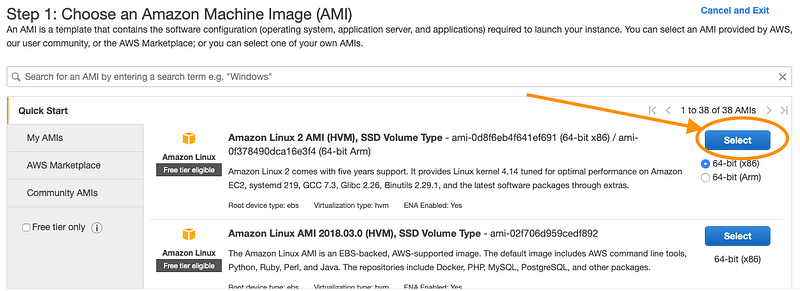
Select an amazon machine image(AMI) template
- In the next screen that shows, select an instance type. t2 nano or t2 micro is recommended as this is faster to setup. Click ‘Next’ to Continue
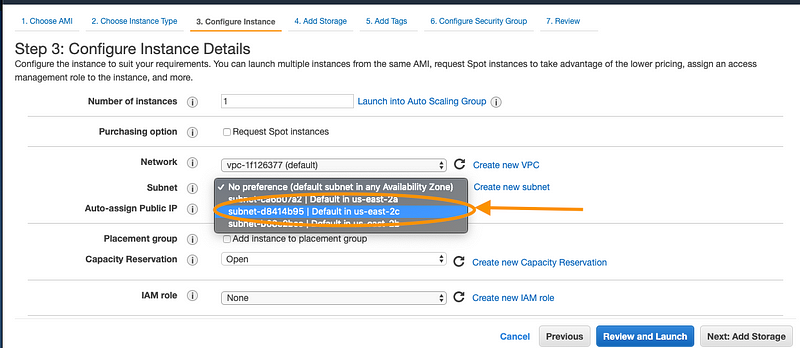
- Next, select the correct availability zone as noted down earlier. (this should be the same as the availability zone of the instance you will like to regain access to) and click ‘Next’
- Leave the storage option as default on the next screen and select ‘Next’ again.
- On the next screen ‘Add Tags’, add a tag for the new instance called ‘RecoverInstance’. this will make it easier to identify this new instance later. Click Next
- Select a security group for the new instance. Click ‘Review and Launch’
- A preview is shown of the instance to be created. Click on ‘Launch’
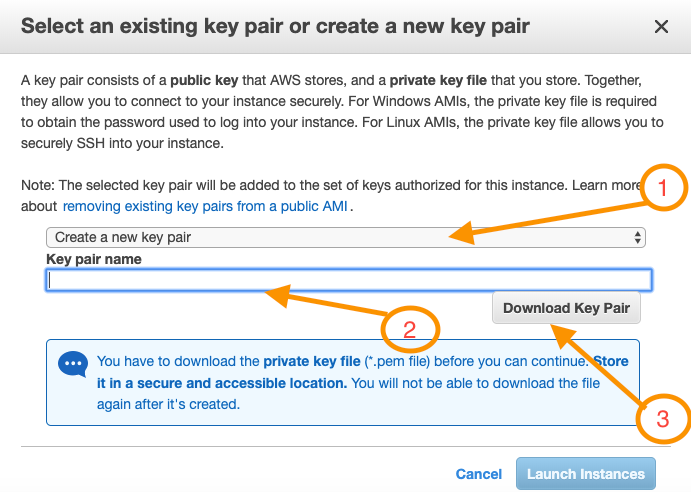
- Now, its time to create a new key-pair. Select ‘Create New Key-pair’ on the popup modal, enter a name for the new key-pair and click download. (This will be the key-pair we will use to access the target instance)
- Next click ‘Launch Instance’ to launch the new instance.
Once the newly created instance is running, connect to the instance using your terminal and the newly generated key-pair as follows
ssh -i {keypair-file-location}.pem {username}@{new-recovery-instance-public-ip/dns}
e.g. ssh -i ~/keys/myKeypair.pem ubuntu@ec2-public-dns-ip
assuming my key-pair is saved in the keys folder of my home directory and my default username for the instance is ‘ubuntu’.
Note: the username depends on the type of instance you launched earlier.
If you get a ‘bad permission’ message, do set the read permission of the key-pair to read only e.g. chmod 0400 {key-pair-file-location}
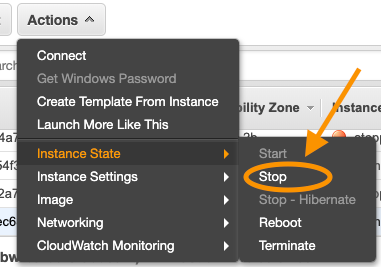
- Once logged in successfully, return to the EC2 management console(web), select the original instance you will like to replace the lost instance key and select ‘stop’.
- Note: if you do not have an Elastic IP, your IP address will change when you restart the instance.
- Once the instance state changes to ‘stopped’, select the instance again, and on the instance properties pane, click on the root device and then click on the volume id.
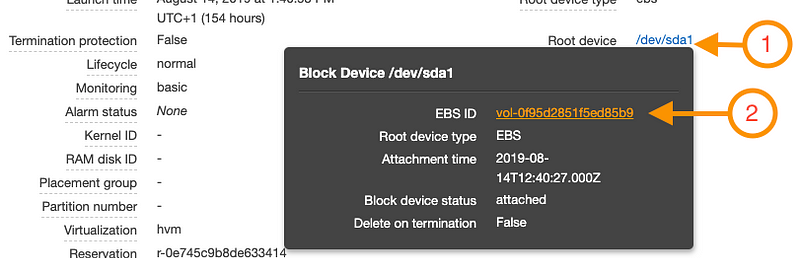
From the volume details page,
Select ‘Actions’ -> ‘Detach Volume’ to detach the volume from the instance.
Wait for the volume state to change to ‘Available’
Now select ‘Actions’ -> ‘Attach Volume’ and in the popup dialog, select the new instance you just created.
The above process detaches the volume of the target instance we will like to gain access to and attaches it to the newly created recovery instance.
Wait for the volume state to change back to ‘In use’
Now, go back to the ssh session established earlier in the terminal.
Run the below commands
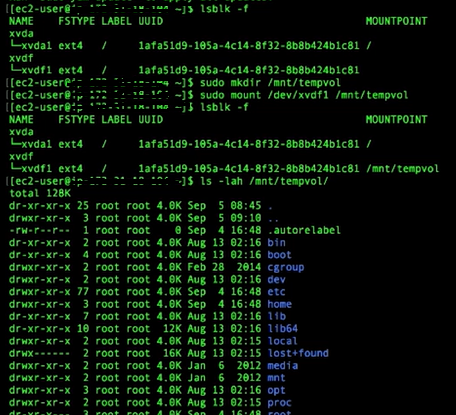
lsblk -f #to view all blocks attached to the instance. you will now notice the new volume is displayed but not mounted yet.
- Next, create a temporary mount directory as follows and mount the volume
sudo mkdir /mnt/tempvol #this creates a temporary mount directory
sudo mount /dev/xvdf1 /mnt/tempvol #this mounts the volume on the temporary mount directory
lsblk -f #now you will see the new volume mounted at /mnt/tempvol
Next, we copy the authorized key file from our new instance to the mounted instance.
use the following commands
cp .ssh/authorized_keys /mnt/tempvol/home/ubuntu/.ssh #copy keys to tempvol assuming the default user for our instance is ubuntu
ls -lah /mnt/tempvol/home/ubuntu/.ssh #lists contents of the .ssh directory
sudo umount /mnt/tempvol #unmounts the temporary volume
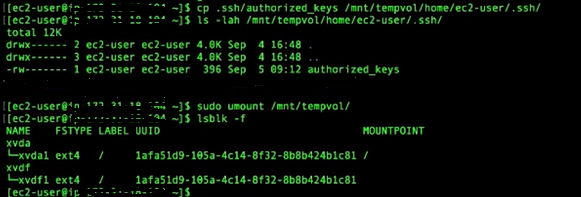
Now the block device is unmounted. You can use ‘lsblk -f’ to confirm
Next, we need to detach the volume from the instance using the ec2 console and reattach it back to the original instance.
- Return back to EC2 console and ensure the volume is selected,
Select ‘Actions’ -> ‘Detach Volume’
Wait for the volume state to change to ‘Available’
Next, we attach the volume back to its original instance
Select ‘Actions’ -> ‘Attach Volume’
on the popup, select the original instance name and set the Device root path back to the same one noted down earlier. e.g. /dev/sda1 or /dev/sdf
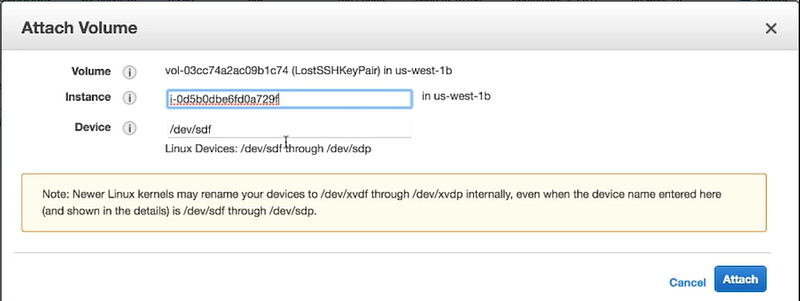
Next, proceed to click ‘Attach’
Finally, return back to the instances show page on EC2,
Select the original instance -> Select Actions -> Start
This starts the original instance we want to regain access to.
Wait for the instance state to change to ‘running’.
Now, try to connect to the instance from the terminal using the earlier created key-pair as follows and it should be accessible.
ssh -i {keypair-file-location}.pem {username}@{original-instance-public-ip/dns}
e.g. ssh -i ~/keys/myKeypair.pem ubuntu@ec2-public-dns-ip
Congratulations!
Now you have regained access back to your instance with a new key-pair.
You can stop/delete the newly created instance to avoid accumulating additional AWS charges for the unused instance.
Please let me know in the comments if this has been helpful to you or if you encounter any challenges with this process and I will be willing to offer you the needed assistance.
Till next time …